Hot Hot Hot --- Jaf Semc Tool Unprotected Version (nopkey)
DOWNLOAD
Supported CID:
CID49
CID51
CID52
Supported models:
DB2020
K530, K550, K550im, K610, K610im, K618, K770, K790, K790a, K800i, K810, K818, S500, T650, T658, V630, W580, W610, W660, W710, W830, W850, W880
DB3150
K630, K660, K850, V640, W890, W910, Z668, Z750. * DB3150 supports only device identification.
Spécial Thanks to : Fast_Unlocking
Showing posts with label Sony Ericsson. Show all posts
Showing posts with label Sony Ericsson. Show all posts
![]()
![]()


![]()
![]()
Back-up your GDFS file and write your GDFS
Click “Read GDFS”, and then hold down the C button on your phone, and then plug in the cable. It will go to a point , where it says “PROGRAMMING FLASH”. Once it says, Unplug the cable , then Unplug your phone, take the battery out, put the battery back in, hold down C, press the “READY” button, then plug the phone back in, but after you plug it in, about 2 seconds after, release the C button. SETool 2 Lite will now read the GDFS and then it will say “Getting GDFS Chunk” , and then it has fully read your GDFS, you can click “Quit”.Take the battery out for about 20 seconds, and then put it back in.
"Write gdfs" will write gdfs to phone in BINARY format. File selected in "MISC. Box" will be assumed as gdfs in binary format.
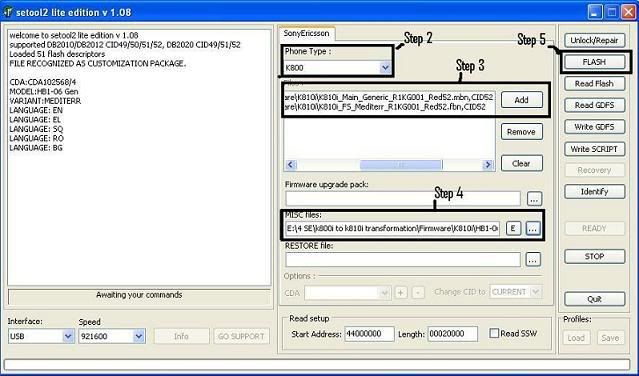
2. Flash your phone using setool2lite
Step 1: Turn off your phone and open setool2lite.
Step 2: Choose your phone model.
Step 3: Press the ADD button and select the Main&FS files (.mbn & .fbn). MAIN and FS can also be bin files. In fact the only important thing is that, they're unencrypted.
Step 4: Select the archive with the customization files (.zip).After it is recognized by the program , in the left side will appear informations about the customization.The archive(.zip) contain files from tpa/preset/custom.
Step 5: Press the FLASH button.
Step 6: Connect the usb cable while holding down the "c" button un your phone. Then wait for the process to finish.
Step 7: Disconnect your phone , get the battery out for 5 seconds , insert battery again and start up the phone।It will appear a screen with "Please Wait...", wait 1-2 minutes and then the phone will start normally.
sofware download is here
setool2lite v 1.11
http://www.fportal.uni.cc/e107_files...2LiteV1.11.rar
Flash Driver for DCU-60 Cable
http://www.4shared.com/file/27136649.../gg-setup.html
![]()
![]()
Back Up GDFS/Restore GDFS
The GDFS contains the calibration data of your phone. Your phone won’t work if the GDFS is damaged. A defective GDFS is hard to fix, therefore you should always backup the GDFS of your phone before you do anything else.
1. Connect your phone while holding down the “C” button.
2. Choose the “GDFS” tab (in “Configuration” on the bottom right)
3. Click “Backup GDFS”
4. Store the GDFS file in a safe place – it could safe your phone after a mistake!
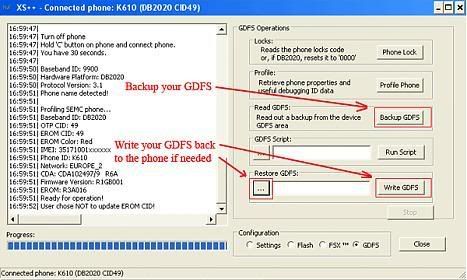

Writing the GDFS back to your phone
If GDFS is damaged choose your backed up GDFS file (make sure you’ve choose the right one) in “Restore GDFS” and click “Write GDFS”.
NOTE: Every GDFS is unique, that means every phone has a different GDFS, even if it’s the same model. If you write the GDFS from another phone to your phone your phone won’t boot up. That’s because the IMEI stored in the new GDFS doesn’t match the IMEI in your OTP. Do NOT write any other GDFS to your phone.
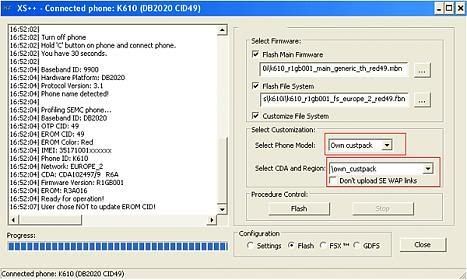
Choosing the correct firmware
XS++ always shows you the EROM CID and the EROM Colour of your phone after connecting. You need to flash firmware matching that CID and Colour or your phone won’t work properly. If you’ve got a BROWN EROM you need to change it to a RED EROM before flashing red firmware to the phone.
Flashing the firmware to your phone
1. Connect your phone while holding down the “C” button.
2. After your XS++ successfully recognized your phone it will switch to the “Flash” tab automatically. Check “Flash Main Firmware”, “Flash File System” and “Customize File System”.
3. Choose your firmware and CDA, then press the “Flash” button.
Do this if the custpack you need is not implemented in XS++:
4. Download the custpack you need
5. Extract the files into the “own_custpack” folder in XS++
NOTE: Make sure that the first folder in own_custpack is “tpa”
6. Do steps 1. and 2.
7. Check “Customize file system”
8. Select “Own Custpack” in the “Select phone Model” dropdown menu
9. Press the “Flash” button
NOTE: Your phone will NOT work if you don’t customize the files system after flashing the FS। You will get an configuration error after trying to turn it on.
sofware download is here and cable dcu 60 driver
xs++ 3.1
http://www.4shared.com/file/32041400...XS_online.html
USB Flash Driver For DCU-60 Cable
http://www.4shared.com/file/27136649.../gg-setup.ह्त्म्ल
DOWNLOAD HERE XS++ 32
![]()
![]()
USB-Smart SEMC Tool 8.7
USB-Smart SEMC Tool 8.7 | 4,17 MB
USB-Smart multiplatform dongle original it's ultimate device allowing fast movements in protection and updates. Based on IBM BlueZ Java Smart Card and own driver for smartcard reader. Possibility to FULL update ALL contents of Smart Card very secure (3DES) over online update by client/server software. Avoid any clone, and future updates can be provided secured and identified for each user. Possibility to choose in future for small fees other models/updates available for USB-Smart multi-box platform. Each user is identified at online update server and at support download based on secure challenge ask/response produced inside dongle by IBM Java Smart Card.
Features:
* first software who READ any zone of flash (Main, File System, Eeprom, EROM) and save the file in REGULAR format who can be used later as input exactly like original files
* first software who accept UNSIGNED flash files as input for write to phone
* Multiple interfaces to connect to phone: Cruiser/Fighter 4 in 1 cable, DSS-20/25 SEMC sync station, T28 serial cable (only for new ARM SEMC phones), Terminator dongle, (JAF and Twister/UFS will be added)
* full repair flashes available in Support Area, allow EASY (kids job) repair of ANY software damage of new SEMC phones
* not need any testpoints on ANY CID, works on all models and Flash/OTP CID numbers (16, 29, 36)
* automaticaly convert RED CID 36 phones to BROWN (to allow unlocking) and after opertaion is done, convert back to RED (user not need to manualy do this operations)
* automaticaly recover damaged certificates, without any selection of files from user, based on OTP CID number.
* super fast write flash, 8 MBytes in less than 2 min. based on algorithm idea from GTI box
(921kbps on DB2010 platform and 430kbps on DB2000 platform)
* same super fast read flash speed
* easy convert K750 to W800, D750 to K750, V800 to Z800, F500 to K500 (also back conversion is possible too).
* no need multiple operations to repair or convert phones, software was developed to allow very easy using
* collected ideas and features (only the good ones) from more tools already available on market
Code:
http://rapidshare.com/files/102646571/SemcTool_v8.7.rar
USB-Smart SEMC Tool 8.7
developer ]
Code:
www.usb-smart.com
operating system ] WinAll
app. language ] English
type of release ] Full.Incl.Crack
released at ] 24.01.2008
app. protection ] EXECryptor/Dongle
app. cracked by ] PE_Kill
reliz packaged by ] PE_Kill
![]()
![]()
REPAIRING EROM GUIDES for most sonyericsson phones dcu-60 cable required !!
Important information
your erom only really needs repairing if it's dead or damaged, a sign of a dead erom is normally a blinking red led in the infra red port.
Do NOT Flash different EROM Phone Model to your phone,
You need to use same CID in EROM as your phone EROM CID. example:You can NOT flash K800 CID51 EROM
to a K800 CID49 Phone.You can flash K800 CID49 EROM to a K800 CID49 Phone
Verify which is your EROM's version, it will be in xs++ logs or setool logs, or connect to xs++ and it will tell you look for this EROM CID: .
xs++3.1 guide needed files
xs++3.1, 4shared.com - online file sharing and storage - download XS++.rar
usb flash drivers for dcu-60 cable, 4shared.com - online file sharing and storage - download gg-setup.exe
cruiser drivers, 4shared.com - free file sharing and storage - share folder
eroms, SE-NSE Forums (Powered by Invision Power Board)
SETOOL 2 LITE 1.10 guide needed files
setool 2 lite 1.10, 4shared.com - free file sharing and storage - share folder
drivers , when you extract setool there will be a folder called drivers all drivers are in there
xs++3.1 erom repair guide, works with dcu-60, works with db2010 cid 36, cid 49, db2012 cid 50 cid 51 cid52, db2020 cid 49 cid 51 cid 52
step A selecting the correct erom, the erom must be in a .bin format.
a.Turn off the phone, remove the battery, sim and memory card,
b.run xs++.exe and press connect, if your using a cruiser cable you must select the correct com port from the drop down select port box.
c.now reinsurt your battery and connect the phone holding down C.
d.you are now connected to xs++.

i have highlighted what needs to match when choosing your new erom.
Platform: <<<<< src="http://i222.photobucket.com/albums/dd234/sniper100590/screen002.jpg" alt="" border="0">
6.press FLASH.
SETOOL 2 LITE 1.10 erom repair guide dcu-60 , supported DB2010/DB2012 CID49/50/51/52, DB2020 CID49/51/52
a.Turn off the phone, remove the battery, sim and memory card,
1.unzip and run setool2 lite 1.08
2.select phone type from phone type drop-down list,
3.press identify
4.reinsurt battery and holding down 2+5 connect the phone
5.press the unlock/repair button

Important information
your erom only really needs repairing if it's dead or damaged, a sign of a dead erom is normally a blinking red led in the infra red port.
Do NOT Flash different EROM Phone Model to your phone,
You need to use same CID in EROM as your phone EROM CID. example:You can NOT flash K800 CID51 EROM
to a K800 CID49 Phone.You can flash K800 CID49 EROM to a K800 CID49 Phone
Verify which is your EROM's version, it will be in xs++ logs or setool logs, or connect to xs++ and it will tell you look for this EROM CID: .
xs++3.1 guide needed files
xs++3.1, 4shared.com - online file sharing and storage - download XS++.rar
usb flash drivers for dcu-60 cable, 4shared.com - online file sharing and storage - download gg-setup.exe
cruiser drivers, 4shared.com - free file sharing and storage - share folder
eroms, SE-NSE Forums (Powered by Invision Power Board)
SETOOL 2 LITE 1.10 guide needed files
setool 2 lite 1.10, 4shared.com - free file sharing and storage - share folder
drivers , when you extract setool there will be a folder called drivers all drivers are in there
xs++3.1 erom repair guide, works with dcu-60, works with db2010 cid 36, cid 49, db2012 cid 50 cid 51 cid52, db2020 cid 49 cid 51 cid 52
step A selecting the correct erom, the erom must be in a .bin format.
a.Turn off the phone, remove the battery, sim and memory card,
b.run xs++.exe and press connect, if your using a cruiser cable you must select the correct com port from the drop down select port box.
c.now reinsurt your battery and connect the phone holding down C.
d.you are now connected to xs++.
i have highlighted what needs to match when choosing your new erom.
Platform: <<
6.press FLASH.
SETOOL 2 LITE 1.10 erom repair guide dcu-60 , supported DB2010/DB2012 CID49/50/51/52, DB2020 CID49/51/52
a.Turn off the phone, remove the battery, sim and memory card,
1.unzip and run setool2 lite 1.08
2.select phone type from phone type drop-down list,
3.press identify
4.reinsurt battery and holding down 2+5 connect the phone
5.press the unlock/repair button
![]()
![]()
open a firmware file of mbn type in the patch generator and press make patch then patch the phone with setool2 lite
DB2020 unlock patch generator
http://rapidshare.com/files/81681053...chGen_v2.0.rar
setool2 lite
http://rapidshare.com/files/81482853...2liteV1.11.rar
![]()
![]()
Custom Files/ 18-Mar-2008 16:55 -
![]()
![]()
NOW YOU CAN FLASH YOUR SonyeEricsson WITH FREE TOOLS
YOU JUST NEED A DCU-60 CABLE (The original cable in phone package)
XS++ 3.1
http://www.4shared.com/file/32041400...XS_online.html
Setool2lite 1.10
http://www.4shared.com/file/33508971...tool2lite.html
Far Manager 1.07
http://www.4shared.com/file/27136179...anager170.html
sepf 10.0.51
http://www.4shared.com/file/27555816...EFP_01051.html
gflash 206
http://www.4shared.com/file/32043297...Flash20b6.html
USB FLASH DRIVER FOR DCU-60 CABLE
http://www.4shared.com/file/27136649.../gg-setup.html
>QUESTIONS, PROBLEMS ABOUT HOW TO USE THESE SOFTS< just write here, I'll do my best to help you।
setool2lite v1.11
http://www.fportal.uni.cc/e107_files...2LiteV1.11.rar
FLASH YOUR PHONE USING setool2lite
1. Back-up your GDFS file and write your GDFS
Click “Read GDFS”, and then hold down the C button on your phone, and then plug in the cable. It will go to a point , where it says “PROGRAMMING FLASH”. Once it says, Unplug the cable , then Unplug your phone, take the battery out, put the battery back in, hold down C, press the “READY” button, then plug the phone back in, but after you plug it in, about 2 seconds after, release the C button. SETool 2 Lite will now read the GDFS and then it will say “Getting GDFS Chunk” , and then it has fully read your GDFS, you can click “Quit”.Take the battery out for about 20 seconds, and then put it back in.
"Write gdfs" will write gdfs to phone in BINARY format. File selected in "MISC. Box" will be assumed as gdfs in binary format.
2. Flash your phone using setool2lite
Step 1: Turn off your phone and open setool2lite.
Step 2: Choose your phone model.
Step 3: Press the ADD button and select the Main&FS files (.mbn & .fbn). MAIN and FS can also be bin files. In fact the only important thing is that, they're unencrypted.
Step 4: Select the archive with the customization files (.zip).After it is recognized by the program , in the left side will appear informations about the customization.The archive(.zip) contain files from tpa/preset/custom.
Step 5: Press the FLASH button.
Step 6: Connect the usb cable while holding down the "c" button un your phone. Then wait for the process to finish.
Step 7: Disconnect your phone , get the battery out for 5 seconds , insert battery again and start up the phone.It will appear a screen with "Please Wait...", wait 1-2 minutes and then the phone will start normally.
Flashing Tutorial with XS++
Back Up GDFS/Restore GDFS
The GDFS contains the calibration data of your phone. Your phone won’t work if the GDFS is damaged. A defective GDFS is hard to fix, therefore you should always backup the GDFS of your phone before you do anything else.
1. Connect your phone while holding down the “C” button.
2. Choose the “GDFS” tab (in “Configuration” on the bottom right)
3. Click “Backup GDFS”
4. Store the GDFS file in a safe place – it could safe your phone after a mistake!
Writing the GDFS back to your phone
If GDFS is damaged choose your backed up GDFS file (make sure you’ve choose the right one) in “Restore GDFS” and click “Write GDFS”.
NOTE: Every GDFS is unique, that means every phone has a different GDFS, even if it’s the same model. If you write the GDFS from another phone to your phone your phone won’t boot up. That’s because the IMEI stored in the new GDFS doesn’t match the IMEI in your OTP. Do NOT write any other GDFS to your phone.
Choosing the correct firmware
XS++ always shows you the EROM CID and the EROM Colour of your phone after connecting. You need to flash firmware matching that CID and Colour or your phone won’t work properly. If you’ve got a BROWN EROM you need to change it to a RED EROM before flashing red firmware to the phone.
Flashing the firmware to your phone
1. Connect your phone while holding down the “C” button.
2. After your XS++ successfully recognized your phone it will switch to the “Flash” tab automatically. Check “Flash Main Firmware”, “Flash File System” and “Customize File System”.
3. Choose your firmware and CDA, then press the “Flash” button.
Do this if the custpack you need is not implemented in XS++:
4. Download the custpack you need
5. Extract the files into the “own_custpack” folder in XS++
NOTE: Make sure that the first folder in own_custpack is “tpa”
6. Do steps 1. and 2.
7. Check “Customize file system”
8. Select “Own Custpack” in the “Select phone Model” dropdown menu
9. Press the “Flash” button
NOTE: Your phone will NOT work if you don’t customize the files system after flashing the FS। You will get an configuration error after trying to turn it on.


![]()
![]()
It seem like people only can read first and last post so we take all in the first post.
Free Patch Unlocking with free tools and DCU-60 cable
All DB2020 CID49/51/52:
K530,K550,K550im,K610,K610im,K618,K770,K790,K800,K 818,S500,T650,V630,W580,W610,W660,W710,W830,W850,w 880,Z610,Z710
If you have DB2020 CID49/51 you need to upgrade it with xs++
Its not posible to unlock w200 CID52 and W810 CID50
Setool2 lite can patch
DB2010/2012 CID49 and DB2020 CID52.
If you have DB2010/2012 CID51/52 it's not posible to patch.
If your phone is not in the list you can select another DB2020 model to patch it.
lets say you have k770 then select k610.
If xs++ dont have your customize pack then create a folder named own_custpack
in xs++ folder unpack your downloaded cust pack and put it in that folder
Always make a backup of your gdfs before working on the phone.
All software in one file.
Rapidshare
http://rapidshare.com/files/83734607..._unlocking.rar
Megaupload
http://www.megaupload.com/?d=APUA88C0
Rapidshare
http://rapidshare.com/files/85926001/DB2020.rar
Megaupload
http://www.megaupload.com/?d=VCBU2J71
here are some ready made patch files for
K530_R6BC002
K530_R8BB001
K550_R6BC002
K550_R8BA024
K610_R1JG001
K770_R8AA018
K770_R8BA024
K790_R1KG001
K800_R1KG001
K800_R8BA024
K810_R1KG001
K810_R8BA024
S500_R8BA024
T650_R7AA024
T650_R8BB001
W580_R6BC002
W580_R8BA024
W610_R1KG001
W610_R8BA024
W660_R6AD001
W660_R8BB001
W710_R1JC002
W850_R1KG001
W880_R1KG001
Z610_R1JG001
Z710_R1JC002
Rapidshare
http://rapidshare.com/files/85887836/Patch_Paket.rar
Megaupload
http://www.megaupload.com/multiupload/se/
![]()
![]()
How to enter my Unlock Code on SonyEricsson ?
Model : All SonyEricsson
1 - Switch ON your phone without SIM Card,
2 - Press 1 time the left arrow,
3 - Press 2 times the button * ,
4 - Press 1 time the left arrow,
5 - The message "Personalize with MNC2" will appear,
6 - You can now enter the Unlock Code we send to you.
If your phone have a "JOGDIAL" (ex : SonyEricsson K700i) you must press "down arrow" instead of
"left arrow" for step 2 & 3. We mean by "Down Arrow" to direct the Jogdial down !
W950 And Others Scrool Models
Service Menu (* up * down down * down *)
Code Menu (* up * down ** down (up/down using the jog dial on the side)
( side, down,**,down )
![]()
![]()
How can we know MAIN file for which phone?
if we lost the folder or no mark for phone model
here is some good info
here is a way = just search for the version string ("prgCXC{bla-bla-bla}")
for example k510 version string: "R4EA031 prgCXC1250231_GENERIC_CO"
A - K500
AG - W888
AI - W880
AL - Z310
C - K700
CA - W800
CH - W710
CL - K750/D750
CN - Z710
CO - K510
CR - W700
CY - W850
DO - K310
EA - W830
EE - W600
EL - W550
EV - K790
HN - W810
JE - W300
KN - J300
KR - K300
LI - K550
LY - S500
ME - W200
MI - K600
ML - Z550
MU - Z530
MW - K618
MY - Z610
NA - W610
SA - W900
SM - K810
T - S700
TH - K610
VI - Z800
WI - K800
K320 - MA
K530 - NC
K608 - MI
K770 - VI
K818 - ZI
S710 - T
T650 - SN
W660 - FY
Z500 - K
Z520 - ZB
Z525 - KA
many thxs to mr:rajiv gi
![]()
![]()
K750 Tips and Tricks:Standby Screen:
*#0000# - Reset language back to English
>*<<*<* (>= move joystick right, <=vice versa *=press * key) --> Service Menu
Hold # --> Silent mode
* , right key --> Lock keypad
+ or - while clock is active -->Highlight clock
+ or - in standby --> view phone info
Left joystick --> Write message (default)
Up joystick --> Media player (default)
Down Joystick --> Contacts (default)
Right joystick --> create custom shortcut if not already set
Press any no. then # -->Brings up call from SIM list
Menus:
C --> delete selected item
+ or - --> increase volume if media is playing
Hold back button--> return to stand by
Settings>Calls>Time & cost>Messages counter --> Number of sent messages
Settings>Calls>Time & cost>Data counter --> Sent/Received Data counter
Menu Shortcuts:
1 --> Play now
2 --> Internet services
3 --> Entertainment*
4 --> Camera
5 --> Messaging*
6 --> Media Player
7 --> File Manager*
8 --> Contacts
9 --> Radio
* --> Calls
0 --> Organizer*
# --> Settings*
Camera:
1 ---> picture size
4 --> Macro mode
7 --> night mode
* --> light
up or down --> switch video/stills
+ or - --> adjusts brightness
The Light will flash brighter once the picture is taken.
Taking pictures in full res. or with effects may cause it to lag.
Receiving call:
+ or - or # --> mute ring tone
Hold + or - ---> reject call
Media player:
Silent turned on, media still plays with sound
Full screen video--> More>Full screen
Settings>General>Music Button --> Change Media button function
Radio/Media player
> --> next track
< --> previous track
^ --> pause
+/- --> adjust volume
hold + --> previous track
hold - --> next track
hold > or < --> to scroll back forward media
* and then "lock keys" to lock whilst playing (still able to use +/- to navigate).
Pause video>menu>capture frame -->Capture Video Frame (saved in pic folder must be done in media player).
Press down when u are playing a movie in the media player and it will go in slow motion.
Radio:
# --> Allows you to type in the radio station instead of scrolling through.
Memory:
Be sure to format a blank memory card via the phone before use.
File manger>More>Format
Check overall memory--> File manager>more>memory status
During Call:
Hold C -->mute/unmute
Misc.:
If you run out of SMS memory --> Remove your sent messages, without needing to delete inbox messages.
Hold + Or - in input text screens --> Highlight text
Creating contact pictures --> Zoom in on the face and save as large. Did not try saving as small or other size, so don’t know how it will appear.
Quick Bluetooth --> Assign one of the Navigation key shortcuts to Bluetooth "Turn on". This way, whenever you press up for example, Bluetooth turns on/off.
Quick Add Number --> Type in number then go to "Other" > Save nr. > New contact.
USB Charger takes longer than Wall Charger. The USB charger also doesn't fully charge the phone.
Find out firmware --> Access service menu (see above) then go to service info>software info and it should be on the top line.
Text Files:
Handling .*** files:
* *** files are saved in web pages\save pages folder.
* You can create .*** files with a windows Notepad or any word processing file and then send the file via USB to the folder mentioned above.
* I have noticed that if a Nokia sends me a *** file, when it has opened the first letter of the message appears only. It appears that the text message body is saved in the filename; therefore, a long filename will not appear. Thus to view the message, after it has been save in the saved pages folder, view it's information, and the message will be seen in full. I have experienced this with one user; I am not sure, if the user deliberately types the message in the filename field or if that is how nokia works.
* Another way of creating text files is by using word and saving them as a web page (html). This is useful if you are using foreign characters, as they will sometimes not appear if saved as. ***.
K700 Tips and Tricks:
Standby Screen:
*#0000# - Reset language back to English
>*<<*<* (>= move joystick right, <=vice versa *=press * key) --> Service
Menu
Hold # or c --> Toggle silent mode
More --> Quick options
+ Or - --> Phone Status
+ Or - when clock is showing --> Turns on backlight
Pressing # and * --> Brings up screen saver
Pressing 7 and 9 -->brings up 9p
*#06# --> Brings up IMEI No.
More>Shortcuts --> to change joystick shortcuts
+ or - Then [Number] --> Quick set volume level e.g. +8 to set at 8.
Menus:
Press letter in address book--> go to name beginning with that letter.
Hold down number --> will take you to the contact with that speed dial in address book.
You can use keypad for fast navigation.
Camera:
1 --> Toggles Picture size
2 --> Toggles Night mode
3 --> Toggles Special Effects
4 --> Toggles Self Timer (not in valid)
5 --> Toggles Flashlight
Joystick Up Or Down --> Toggles Zoom
-video mode: 176 - 2x zoom - 128 - 2x 4x zoom
-pic mode: 320 - 2x zoom - 160 - 2x 4x zoom
Put phone in silent --> Mutes camera noise (only on some phones)
Hold * and move joystick down --> Lowers brightness
Hold 0 and move joystick up-->Increases brightness
Use binoculars> Get more than 4x Zoom
Press C after photo taken --> Delete w/o the need to browse through the folders.
Media player:
+ or - during radio and locked --> Changes radio station when phone is locked.
1 --> Shows estimated time left (seconds)
2 --> Turns it back to normal time view (seconds already past).
Hold + or - --> Next Track
Use folders --> Organize music e.g. rock and/or get rid of ringbones (create music folder).
*>More -->can lock keys w/o minimizing.
Misc.:
Find out firmware --> Access service menu (see above) then go to service info>software info and it should be on the top line
Supports Animated wallpapers
Joystick can be customized, ALL four directions.
Settings> display> light> automatic --> Turn the screensaver clock on.
Left soft key when playing slide show -->Pauses slide show.
Create New Bookmark >Name: Sms >URL: sms: >Save >Set Bookmark as Homepage --> Set online Key for SMS.
Name: Email >URL: mailto: --> same as above but for email.
Hold * >get p- used for skipping voice automated phones e.g. instead of phoning 603123456 then pressing 32 to go to those options dial 603123456p3p2.
Send *** file to others folder>send via mms -->Can read *** files.
More when viewing picture --> photo editor (only available on 160*120 sized pics).
Photo editor> + or - --> Effects (ripple, emboss etc).
When replying to ***>More > Add Item > Original Message --> Include original message.
When receiving a call> - Or + --> Will stop both the vibrate and the ring tone but it will not reject the call.
During call press + then - --> Increases volume to max.
Hidden smiles (in sms):
:-x --> Hidden Kiss Smiley.
:-] --> wide smile
:-[ --> wide frown
[:] --> Robot
T And Z Series Tips and Tricks:
Standby Screen:
*#0000# - Reset language back to English
>*<<*<* (>= move joystick right, <=vice versa *=press * key) --> Service Menu
< --> leads to the first item on shortcut list
Holding down corresponding number on the keypad --> Will lead you to the corresponding name in your address book. i.e.: holding down #5 will lead to letter "j" on your book.
# --> brings up screen saver.
More>Post --> Can post notes.
+ Or - --> Phone Status
Press # then no. --> Goes to no.'s contact on sim.
Hold < --> SMS Popup.
Hold C --> Silent mode
Menus:
Hold back --> Returns to standby screen
Contact edit:
*1 -> cut
*2 -> copy
*3 -> paste
Camera:
1 --> Toggles Picture Size
2 --> Toggles Night mode
3 --> Toggles Special Effects
4 --> Self Timer
Up Or Down --> Adjusts Brightness
Misc.:
On the calendar, you can set your phone to switch profiles at a given date and time using the auto switch option.
Put frequent text recipients as an individual group. i.e. group†john" members: john -->Quick SMS Recipients.
P Series Tips and Tricks:
Flip Closed then Jog-Up * Jog-Down Jog-Down * Jog-Down * --> Service menu.
Go to the Control Panel > Connections > Internet Accounts > other tab >Preferred mode to GSM only --> Increase Battery Life.
File manager> open image> choose the folder that the pics are in> check the pictures you want to hide> click on file> properties> check the hidden box --> Hide Pictures.
If you ever find your icons (apps residing in memory stick) missing out all a sudden, do not reset you phone but simply reload your memory stick.
*#06# --> Shows IMEI No.
Flip Closed then jog dial down * * jog dial down --> Network Lock Menu. Be carfull o not mess around in this setting as you could end up permanently locking your phone!
You can have animated gifs for flipped closed wallpaper.
Hold C --> Silent Mode
**61*Voicemail Number*11*delay#[SEND] --> Diverts unanswered calls to voicemail after a set delay The delay can be anything from 5-30 seconds. Your Voicemail Number must be your actual voicemail box. Not the short code i.e. 121 for example **61*+44123456*11*30# will divert to +44123456 after 30 seconds.
Battery Tap the battery icon in the bottom right and click Settings. Click on the Screen tab and set the Screen saver to none. Click on the Power tab. set the Light to Auto, Light (car) to off. Set Power saves to either Clock or Blank and Activate after 2-3 minutes. --> Increase Battery Life
View SMS> edit> Show subject --> See more sms in one page.
Flip Closed> Hold Options key --> Go straight to applications menu.
If you open the flip during a call, the speakerphone function is activated. This lets you continue the conversation while using other functions of the phone.
k750i: Press down when u are playing a movie in the media player and it will go in slow motion.
*#0000# - Reset language back to English
>*<<*<* (>= move joystick right, <=vice versa *=press * key) --> Service Menu
Hold # --> Silent mode
* , right key --> Lock keypad
+ or - while clock is active -->Highlight clock
+ or - in standby --> view phone info
Left joystick --> Write message (default)
Up joystick --> Media player (default)
Down Joystick --> Contacts (default)
Right joystick --> create custom shortcut if not already set
Press any no. then # -->Brings up call from SIM list
Menus:
C --> delete selected item
+ or - --> increase volume if media is playing
Hold back button--> return to stand by
Settings>Calls>Time & cost>Messages counter --> Number of sent messages
Settings>Calls>Time & cost>Data counter --> Sent/Received Data counter
Menu Shortcuts:
1 --> Play now
2 --> Internet services
3 --> Entertainment*
4 --> Camera
5 --> Messaging*
6 --> Media Player
7 --> File Manager*
8 --> Contacts
9 --> Radio
* --> Calls
0 --> Organizer*
# --> Settings*
Camera:
1 ---> picture size
4 --> Macro mode
7 --> night mode
* --> light
up or down --> switch video/stills
+ or - --> adjusts brightness
The Light will flash brighter once the picture is taken.
Taking pictures in full res. or with effects may cause it to lag.
Receiving call:
+ or - or # --> mute ring tone
Hold + or - ---> reject call
Media player:
Silent turned on, media still plays with sound
Full screen video--> More>Full screen
Settings>General>Music Button --> Change Media button function
Radio/Media player
> --> next track
< --> previous track
^ --> pause
+/- --> adjust volume
hold + --> previous track
hold - --> next track
hold > or < --> to scroll back forward media
* and then "lock keys" to lock whilst playing (still able to use +/- to navigate).
Pause video>menu>capture frame -->Capture Video Frame (saved in pic folder must be done in media player).
Press down when u are playing a movie in the media player and it will go in slow motion.
Radio:
# --> Allows you to type in the radio station instead of scrolling through.
Memory:
Be sure to format a blank memory card via the phone before use.
File manger>More>Format
Check overall memory--> File manager>more>memory status
During Call:
Hold C -->mute/unmute
Misc.:
If you run out of SMS memory --> Remove your sent messages, without needing to delete inbox messages.
Hold + Or - in input text screens --> Highlight text
Creating contact pictures --> Zoom in on the face and save as large. Did not try saving as small or other size, so don’t know how it will appear.
Quick Bluetooth --> Assign one of the Navigation key shortcuts to Bluetooth "Turn on". This way, whenever you press up for example, Bluetooth turns on/off.
Quick Add Number --> Type in number then go to "Other" > Save nr. > New contact.
USB Charger takes longer than Wall Charger. The USB charger also doesn't fully charge the phone.
Find out firmware --> Access service menu (see above) then go to service info>software info and it should be on the top line.
Text Files:
Handling .*** files:
* *** files are saved in web pages\save pages folder.
* You can create .*** files with a windows Notepad or any word processing file and then send the file via USB to the folder mentioned above.
* I have noticed that if a Nokia sends me a *** file, when it has opened the first letter of the message appears only. It appears that the text message body is saved in the filename; therefore, a long filename will not appear. Thus to view the message, after it has been save in the saved pages folder, view it's information, and the message will be seen in full. I have experienced this with one user; I am not sure, if the user deliberately types the message in the filename field or if that is how nokia works.
* Another way of creating text files is by using word and saving them as a web page (html). This is useful if you are using foreign characters, as they will sometimes not appear if saved as. ***.
K700 Tips and Tricks:
Standby Screen:
*#0000# - Reset language back to English
>*<<*<* (>= move joystick right, <=vice versa *=press * key) --> Service
Menu
Hold # or c --> Toggle silent mode
More --> Quick options
+ Or - --> Phone Status
+ Or - when clock is showing --> Turns on backlight
Pressing # and * --> Brings up screen saver
Pressing 7 and 9 -->brings up 9p
*#06# --> Brings up IMEI No.
More>Shortcuts --> to change joystick shortcuts
+ or - Then [Number] --> Quick set volume level e.g. +8 to set at 8.
Menus:
Press letter in address book--> go to name beginning with that letter.
Hold down number --> will take you to the contact with that speed dial in address book.
You can use keypad for fast navigation.
Camera:
1 --> Toggles Picture size
2 --> Toggles Night mode
3 --> Toggles Special Effects
4 --> Toggles Self Timer (not in valid)
5 --> Toggles Flashlight
Joystick Up Or Down --> Toggles Zoom
-video mode: 176 - 2x zoom - 128 - 2x 4x zoom
-pic mode: 320 - 2x zoom - 160 - 2x 4x zoom
Put phone in silent --> Mutes camera noise (only on some phones)
Hold * and move joystick down --> Lowers brightness
Hold 0 and move joystick up-->Increases brightness
Use binoculars> Get more than 4x Zoom
Press C after photo taken --> Delete w/o the need to browse through the folders.
Media player:
+ or - during radio and locked --> Changes radio station when phone is locked.
1 --> Shows estimated time left (seconds)
2 --> Turns it back to normal time view (seconds already past).
Hold + or - --> Next Track
Use folders --> Organize music e.g. rock and/or get rid of ringbones (create music folder).
*>More -->can lock keys w/o minimizing.
Misc.:
Find out firmware --> Access service menu (see above) then go to service info>software info and it should be on the top line
Supports Animated wallpapers
Joystick can be customized, ALL four directions.
Settings> display> light> automatic --> Turn the screensaver clock on.
Left soft key when playing slide show -->Pauses slide show.
Create New Bookmark >Name: Sms >URL: sms: >Save >Set Bookmark as Homepage --> Set online Key for SMS.
Name: Email >URL: mailto: --> same as above but for email.
Hold * >get p- used for skipping voice automated phones e.g. instead of phoning 603123456 then pressing 32 to go to those options dial 603123456p3p2.
Send *** file to others folder>send via mms -->Can read *** files.
More when viewing picture --> photo editor (only available on 160*120 sized pics).
Photo editor> + or - --> Effects (ripple, emboss etc).
When replying to ***>More > Add Item > Original Message --> Include original message.
When receiving a call> - Or + --> Will stop both the vibrate and the ring tone but it will not reject the call.
During call press + then - --> Increases volume to max.
Hidden smiles (in sms):
:-x --> Hidden Kiss Smiley.
:-] --> wide smile
:-[ --> wide frown
[:] --> Robot
T And Z Series Tips and Tricks:
Standby Screen:
*#0000# - Reset language back to English
>*<<*<* (>= move joystick right, <=vice versa *=press * key) --> Service Menu
< --> leads to the first item on shortcut list
Holding down corresponding number on the keypad --> Will lead you to the corresponding name in your address book. i.e.: holding down #5 will lead to letter "j" on your book.
# --> brings up screen saver.
More>Post --> Can post notes.
+ Or - --> Phone Status
Press # then no. --> Goes to no.'s contact on sim.
Hold < --> SMS Popup.
Hold C --> Silent mode
Menus:
Hold back --> Returns to standby screen
Contact edit:
*1 -> cut
*2 -> copy
*3 -> paste
Camera:
1 --> Toggles Picture Size
2 --> Toggles Night mode
3 --> Toggles Special Effects
4 --> Self Timer
Up Or Down --> Adjusts Brightness
Misc.:
On the calendar, you can set your phone to switch profiles at a given date and time using the auto switch option.
Put frequent text recipients as an individual group. i.e. group†john" members: john -->Quick SMS Recipients.
P Series Tips and Tricks:
Flip Closed then Jog-Up * Jog-Down Jog-Down * Jog-Down * --> Service menu.
Go to the Control Panel > Connections > Internet Accounts > other tab >Preferred mode to GSM only --> Increase Battery Life.
File manager> open image> choose the folder that the pics are in> check the pictures you want to hide> click on file> properties> check the hidden box --> Hide Pictures.
If you ever find your icons (apps residing in memory stick) missing out all a sudden, do not reset you phone but simply reload your memory stick.
*#06# --> Shows IMEI No.
Flip Closed then jog dial down * * jog dial down --> Network Lock Menu. Be carfull o not mess around in this setting as you could end up permanently locking your phone!
You can have animated gifs for flipped closed wallpaper.
Hold C --> Silent Mode
**61*Voicemail Number*11*delay#[SEND] --> Diverts unanswered calls to voicemail after a set delay The delay can be anything from 5-30 seconds. Your Voicemail Number must be your actual voicemail box. Not the short code i.e. 121 for example **61*+44123456*11*30# will divert to +44123456 after 30 seconds.
Battery Tap the battery icon in the bottom right and click Settings. Click on the Screen tab and set the Screen saver to none. Click on the Power tab. set the Light to Auto, Light (car) to off. Set Power saves to either Clock or Blank and Activate after 2-3 minutes. --> Increase Battery Life
View SMS> edit> Show subject --> See more sms in one page.
Flip Closed> Hold Options key --> Go straight to applications menu.
If you open the flip during a call, the speakerphone function is activated. This lets you continue the conversation while using other functions of the phone.
k750i: Press down when u are playing a movie in the media player and it will go in slow motion.
![]()
![]()
CID = This "number" defines the version of SE's protection present in the phone.New CIDs are deployed from time to time, for the sole reason of preventing them from beeing unlocked/flashed/tampered with by non-SE service tools. Current CIDs in use by SE are 29/36/37/49. SE-based LG/Sharp phones use the same system (but different versions). The OTP (One Time Programmable memory) and EROM of a phone might be protected by different CIDs, usually the case in newer K600s/K608s.
CDA = This "number" defines which variant of a specific firmware a phone is supposed to have.It lets among others SEUS (Sony Ericsson Update Service) know which language-pack/branding/bandlocks a phone is to be flashed with. A generic (unbranded) K750 for use in
BLUE/BROWN/RED:This "color" defines what kind of phone we are dealing with.BLUE phones has been assembled at the factory, but never been programmed with software/GDFS/IMEI (remember kids: the IMEI is stored in the OTP (One Time Programmable memory))BROWN phones are "developer phones", for testing. Less restrictions are present, as these are used for "debugging/beta" purposes. As of CID36, a phone has to be converted to BROWN to unlock it.RED phones are your typical retail ones.
GDFS:This is the phones "stash", where all settings and calibration data is stored (this also goes for the firmwares IMEI-resource as well as the SIMlocks). Similar to other brands use of NVRAM (Non-Viotile Random Access Memory).
IMEI = International Mobile Equipment Identity.A 15-digit number which includes information on the origin, model, and serial number of the device. The model and origin comprise the initial 8-digit portion of the IMEI, known as the "Type Allocation Code/TAC". The remainder of the IMEI is manufacturer-defined, with a "Luhn check digit" at the end (which is never transmitted). The "Luhn check digit" is calculated from the rest of the IMEI.
It should be noted that in SE-based phones, the IMEI is stored in two places, the OTP (One Time Programmable memory) and GDFS. The GDFS IMEI is normally read from the OTP, but this can be circumvented by SETool function to "change" the IMEI. This patches the firmware into allowing different OTP/GDFS IMEIs. It is the GDFS IMEI that is reported to the network, so changing this will "de-bar" blocked phones. SEUS is not fooled by this, on the other hand, and it should also be noted that doing this is illegal in most countries.
EMMA = Service software/solution by SE themselves. Protected by the EMMA smartcard to prevent non-licensed usage. Current version is EMMA3, though EMMA2 is still alive (but kinda useless on newer phones). The EMMA smartcard contains an algorithm that allows EMMA to communicate directly to/with the phones CID, so performing operations the way they were intended. The smartcard and its algorithm has not been cracked. Current EMMA access levels exists:Service Update - Can't unlock phones.Service Update Pro - Can't unlock phones.Network Operator - Can't unlock phones (but sure as hell can lock them ).Service Center Std - Can't unlock phones.Service Center Rc - Can unlock phones, as they have a special version of the smartcard with a CSCA key.Research & Development - Can unlock phones, as they have a special version of the smartcard with a CSCA key.
DB2000, DB2010, DB2020 = SEMC (Sony Ericsson Mobile Communications) hardware platforms. It's something similar to chipset in PC.DB2000 (another name is Marita) is a GSM+3G(UMTS) capable platform, SE K600/K608/V600/Z800/W900, Sharp 802sh, 902sh, 903sh and LG 3G phones are based on it.DB2010/2012 (Marita compact) is GSM-only, non-3G, platform. Most not very old and modern SE phones like K300,K500,K700,K750,S700,W300,W550,W800,Z520,Z530 are based on this chipset.DB2020 is the newest product of SEMC. K800, K790, K610, Z710 etc, Sharp 904sh feature this most secure (from SE's point of view) platform.
![]()
![]()
Here Is Little Info About SonyEricsson DB2010/12, DB2020 Series..
May Be This Can Help All Users..
1 . What Is DB2010/12, DB2020 Series ?
A . SEMC (Sony Ericsson Mobile Communications) hardware platforms. It's something similar to chipset in PC. more information see here
2 . how to check Sony ericsson firmware version
A . > * < < * < * Where <> are directions on the joystick, and * is the bottom left hand button on the keypad.
3 . What Is firmware Version?
A. firmware Version Which Ur Phone Have. You Must Flash Same Version Or Newer Then It MAIN Or fs File To Phone Only..
4 .How to enter my Unlock Code on SonyEricsson ?
A . Model : All SonyEricsson
1 - Switch ON your phone without SIM Card,
2 - Press 1 time the left arrow,
3 - Press 2 times the button * ,
4 - Press 1 time the left arrow,
5 - The message "Personalize with MNC2" will appear,
6 - You can now enter the Unlock Code we send to you.
If your phone have a "JOGDIAL" (ex : SonyEricsson K700i) you must press "down arrow" instead of
"left arrow" for step 2 & 3. We mean by "Down Arrow" to direct the Jogdial down !
W950 And Others Scrool Models
Service Menu (* up * down down * down *)
Code Menu (* up * down ** down (up/down using the jog dial on the side)
( side, down,**,down )
5 . What Is Cid?
A . This "number" defines the version of SE's protection present in the phone. New CIDs are deployed from time to time.
Current CIDs in use by SE are 29/36/37/49/50/51/52 & now 53.
6 . What Is GDFS?
A . This is the phones "stash", where all settings and calibration data is stored (this also goes for the firmwares IMEI-resource as well as the SIMlocks). Similar to other brands use of NVRAM (Non-Viotile Random Access Memory).
7 . What Is Rezone We Need XS ++?
A. [1] To Flash Firmware To Phone [2] Firmware File upgrade To Phone [3] customize phone ...link here
8 . how to connect phone with pc?
A . Simple Just Connect Phone At Flash Mode [hold c button then connect phone with dcu-60 cable]
9 . How To Flash Phone With XS ++?
Select Correct main/fs Flash File And Press Flash..
10 .What Is Rezone We Need Se Tool 2 Lite ?
[1] To Flash Firmware To Phone [2] Firmware File upgrade To Phone. [3] All DB2020 CID49/51/52 & DB2010/12 49 unlock ....link here
11 . where i get usb flash drivers for dcu-60 cable ?
A . link is here
![]()
![]()
Subscribe to:
Posts (Atom)

